Air conditioners – prep for winter

You are viewing an old revision of this post, from October 16, 2013 @ 06:33:35. See below for differences between this version and the current revision.

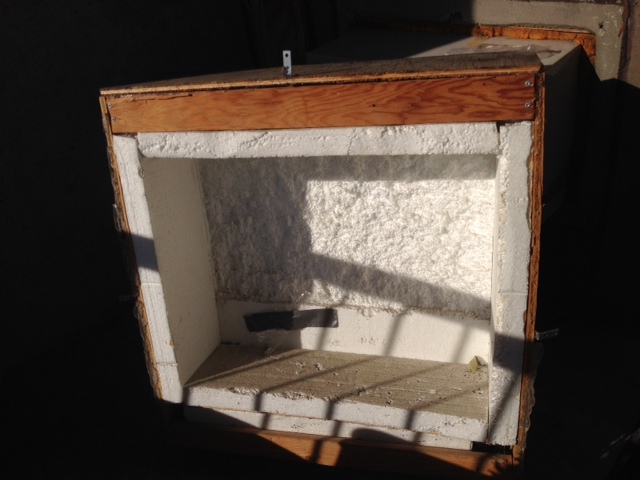
Your wall-mounted air conditioner must be prepared for winter so it cannot allow cold air to enter your unit and freeze the heating pipes below. Owners could be liable for any damage as even a little cold air entry could lead to pipe freezing. An insulated box, caulked around the edges and covering the air conditioner on the balcony side, should do. Please refer to the example below.

ac_photo_1

Interior of insulated box

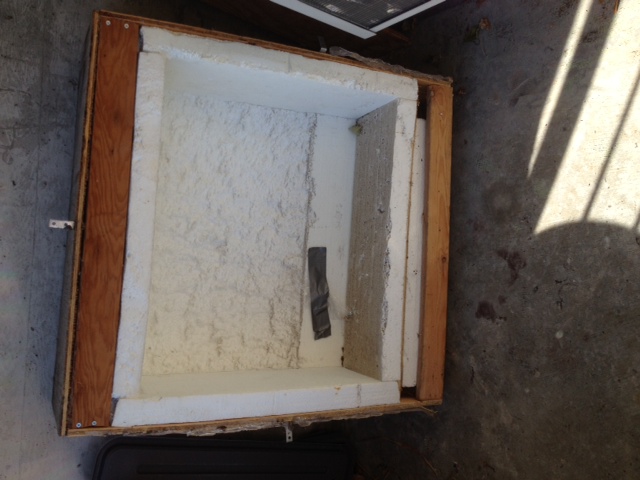
ac_photo_2

Insulated box, rotated

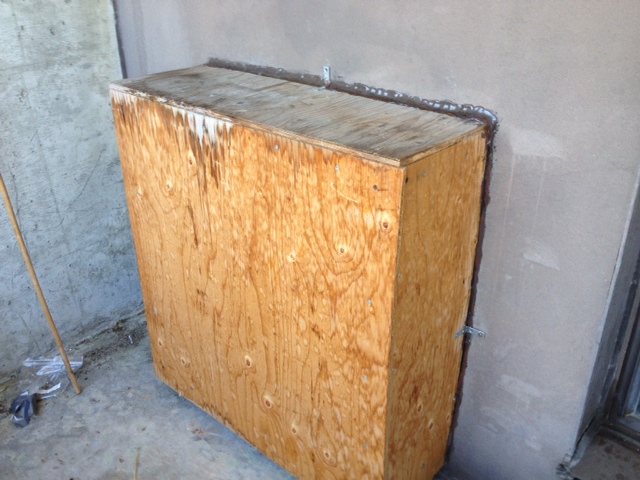
ac_photo_3

Box cover in place

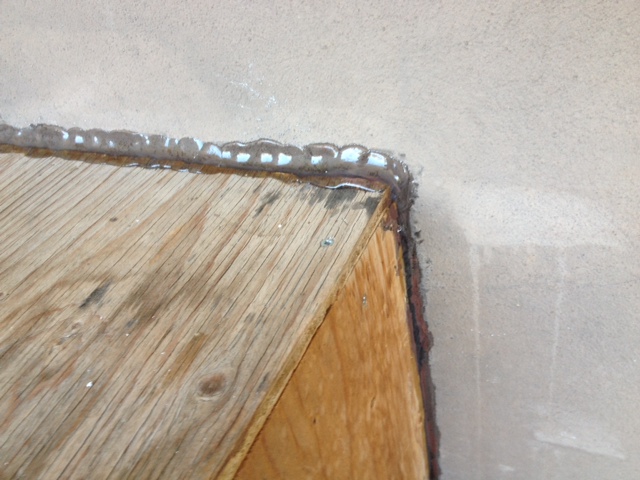
ac_photo_4

Close-up of caulking around box


If you’re handy you could do similar work yourself but you might prefer to hire a contractor.

Doug Brandy, October 15, 2013

Post Revisions:

Changes:

October 16, 2013 @ 06:33:35Current Revision
Content
Deleted: Your wall-mounted air conditioner must be prepared for winter so it cannot allow cold air to enter your unit and freeze the heating pipes below. Owners could be liable for any damage as even a little cold air entry could lead to pipe freezing. An insulated box, caulked around the edges and covering the air conditioner on the balcony side, should do. Please refer to the example below. Added: Your wall-mounted air conditioner must be prepared for winter so it cannot allow any cold air to enter your unit through the air conditioner opening and freeze the heating pipes below. Owners could be liable for any damage as even a tiny air leak admitting cold air  could lead to pipe freezing. Please refer to the example below. It shows an insulated wooden box whose joints are sealed with caulking, covering the air conditioner on the balcony side.
Deleted: <a href="http:// frobisherplace.ca/wp-content/ uploads/2013/ 10/ac_photo_1.jpg"><img class=" wp-image-792" title="Inside an A/C cover box" alt="ac_photo_1" src="http://frobisherplace.ca/ wp-content/uploads/2013/10/ ac_photo_1.jpg" width="640" height="480" /></a> Interior of insulated box Added: <a href="http:// frobisherplace.ca/wp-content/ uploads/2013/ 10/ac_photo_1.jpg"><img class=" wp-image-792" title="Inside an A/C cover box" src="http://frobisherplace.ca/ wp-content/uploads/2013/10/ ac_photo_1.jpg" alt="ac_photo_1" width="640" height="480" /></a> Interior of insulated box
Deleted: <a href="http:// frobisherplace.ca/wp-content/ uploads/2013/ 10/ac_photo_2.jpg"><img class=" wp-image-793" title="Interior of box" alt="ac_photo_2" src="http://frobisherplace.ca/ wp-content/uploads/2013/10/ ac_photo_2.jpg" width="640" height="480" /></a> Insulated box, rotated Added: <a href="http:// frobisherplace.ca/wp-content/ uploads/2013/ 10/ac_photo_2.jpg"><img class=" wp-image-793" title="Interior of box" src="http://frobisherplace.ca/ wp-content/uploads/2013/10/ ac_photo_2.jpg" alt="ac_photo_2" width="640" height="480" /></a> Insulated box, rotated
Deleted: <a href="http:// frobisherplace.ca/wp-content/ uploads/2013/ 10/ac_photo_3.jpg"><img class=" wp-image-794" title="Box cover" alt="ac_photo_3" src="http://frobisherplace.ca/ wp-content/uploads/2013/10/ ac_photo_3.jpg" width="640" height="480" /></a> Box cover in place Added: <a href="http:// frobisherplace.ca/wp-content/ uploads/2013/ 10/ac_photo_3.jpg"><img class=" wp-image-794" title="Box cover" src="http://frobisherplace.ca/ wp-content/uploads/2013/10/ ac_photo_3.jpg" alt="ac_photo_3" width="640" height="480" /></a> Box cover in place
Deleted: <a href="http:// frobisherplace.ca/wp-content/ uploads/2013/ 10/ac_photo_4.jpg"><img class=" wp-image-791" title="Caulked" alt="ac_photo_4" src="http://frobisherplace.ca/ wp-content/uploads/2013/10/ ac_photo_4.jpg" width="640" height="480" /></a> Close-up of caulking around box Added: <a href="http:// frobisherplace.ca/wp-content/ uploads/2013/ 10/ac_photo_4.jpg"><img class=" wp-image-791" title="Caulked" src="http://frobisherplace.ca/ wp-content/uploads/2013/10/ ac_photo_4.jpg" alt="ac_photo_4" width="640" height="480" /></a> Close-up of caulking around box
Unchanged: &nbsp;Unchanged: &nbsp;
 Added: It is essential that the connection joint between the box and the outside wall is also completely airtight. This can be achieved through caulking all four sides.
 Added: If a pliable seal is located between the wall and the box it is still necessary to apply aluminum foil tape, or other air tight tape, over the joint between the wall and the box. Again, all four sides need to be done.
Unchanged: If you’re handy you could do similar work yourself but you might prefer to hire a contractor.Unchanged: If you’re handy you could do similar work yourself but you might prefer to hire a contractor.
Deleted: - <a title="Email Doug" href="mailto: dbrandy0882@rogers.com">Doug Brandy</a>, October 15, 2013 Added: - <a title="Email Doug" href="mailto: dbrandy0882@rogers.com">Doug Brandy</a>, updated November 18, 2014

Note: Spaces may be added to comparison text to allow better line wrapping.